
Learning how to hang a picture may seem like a simple task, but achieving a professional-looking result requires careful planning, accurate measurements, and the right tools. A properly hung picture can transform a room, create a focal point, and enhance the overall appearance of a living space. On the other hand, a crooked frame, poorly placed artwork, or damaged wall can negatively impact the aesthetics of your home.
Whether you are decorating a new house, refreshing an existing room, or creating a gallery wall, understanding the correct techniques can save time, prevent unnecessary holes, and ensure your artwork remains secure. From selecting the ideal location to choosing the appropriate hardware, every step contributes to a polished and attractive display. This comprehensive guide explains everything you need to know about hanging pictures safely, accurately, and professionally.
Why Proper Picture Hanging Matters
Pictures, artwork, photographs, and decorative frames contribute significantly to interior design. They add personality, visual interest, and emotional value to a room. However, even beautiful artwork can appear awkward if it is not positioned correctly.
Proper picture placement creates balance and harmony within a space. It helps draw attention to important design elements while complementing furniture, lighting, and architectural features. A carefully hung picture can make a small room feel larger, add warmth to empty walls, and create a cohesive design theme throughout your home.
In addition to aesthetics, proper hanging techniques ensure safety. Heavy frames that are not securely mounted can fall, causing damage to walls, furniture, or even injury. Understanding how to select suitable mounting hardware helps prevent these problems.
Tools You Need to Hang a Picture
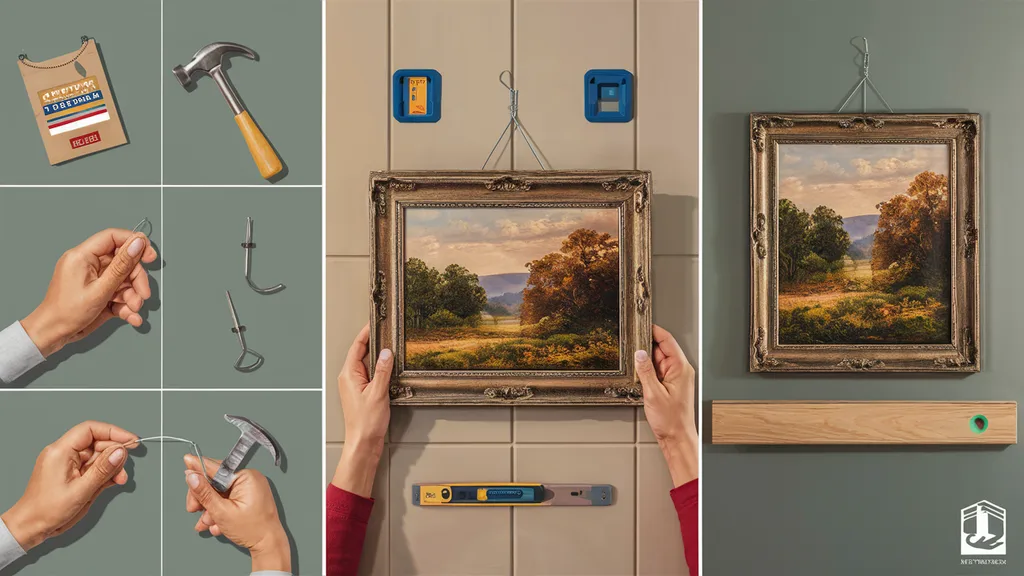
Before starting, gather the necessary tools and supplies. Having everything ready will make the process easier and more efficient.
Essential tools include:
- Measuring tape
- Pencil
- Level
- Hammer
- Picture hooks
- Nails
- Wall anchors
- Stud finder
- Screwdriver
- Hanging wire or D-rings
The type of hardware you use depends on the size and weight of the picture as well as the wall material. Drywall, plaster, brick, and concrete walls may require different mounting solutions.
How to Choose the Perfect Location
One of the most important steps in hanging a picture is selecting the right location. Placement affects both functionality and visual appeal.
A common interior design guideline is to position the center of the picture approximately 57 to 60 inches from the floor. This measurement corresponds to average eye level and creates a comfortable viewing experience.
When hanging artwork above furniture such as sofas, beds, or consoles, leave approximately 6 to 12 inches of space between the furniture and the bottom of the frame. This creates a visual connection between the furniture and the artwork without making the wall appear crowded.
Consider lighting conditions as well. Natural and artificial lighting can highlight artwork and improve visibility. Avoid placing valuable pieces in direct sunlight, as prolonged exposure may cause fading.
Step-by-Step Instructions for Hanging a Picture
Step 1: Measure the Picture
Measure the height and width of the frame. Knowing the dimensions helps determine the exact placement and ensures balanced positioning on the wall.
Step 2: Mark the Desired Location
Use a pencil to lightly mark where you want the center of the picture to be. Double-check the placement before making any holes in the wall.
Step 3: Determine the Hanging Point
Measure the distance between the top of the frame and the hanging wire or mounting hardware. This measurement helps identify where the hook or nail should be installed.
Step 4: Install the Hardware
Choose hardware appropriate for the frame’s weight. Lightweight pictures may only require a simple nail, while heavier artwork often requires wall anchors or screws.
Step 5: Hang the Picture
Carefully place the frame onto the installed hardware. Take your time to ensure it is properly seated and secure.
Step 6: Check for Level Alignment
Use a level to verify that the picture hangs straight. Adjust as needed until the frame appears perfectly horizontal.
How to Hang Heavy Pictures Safely
How to Hang a Picture Large mirrors, oversized artwork, and heavy frames require additional support. Whenever possible, mount heavy items directly into wall studs. Studs provide significantly more support than drywall alone.
Use a stud finder to locate studs behind the wall. If a stud is unavailable in the desired location, install heavy-duty wall anchors rated for the frame’s weight.
For extremely heavy pieces, consider using multiple mounting points to distribute weight evenly and improve stability.
How to Create a Gallery Wall
Gallery walls have become increasingly popular in modern home design. They allow homeowners to display multiple pictures, artwork pieces, and photographs in a visually appealing arrangement.
Begin by arranging frames on the floor before hanging them. Experiment with spacing and layout options until you achieve a balanced composition. Maintain consistent spacing between frames, typically two to four inches apart.
Start hanging from the center of the arrangement and work outward. This approach helps maintain symmetry and prevents misalignment.
A gallery wall can include family photographs, artwork, inspirational quotes, travel memories, and decorative elements that reflect your personal style.
Common Picture Hanging Mistakes to Avoid
Many people make avoidable mistakes when hanging pictures. One of the most common errors is placing artwork too high. Pictures positioned near the ceiling often appear disconnected from the room’s furnishings.
Another mistake involves ignoring frame weight. Using inadequate hardware can lead to instability and potential damage.
Uneven spacing, inaccurate measurements, and failing to use a level are additional issues that affect appearance. Taking a few extra minutes to measure carefully can significantly improve the final result.
Picture Hanging Tips for Different Wall Types
Drywall
Drywall is common in many homes and generally supports lightweight to medium-weight pictures. Use wall anchors for heavier frames.
Plaster Walls
Plaster walls can crack if not handled carefully. Drill pilot holes and use specialized anchors designed for plaster surfaces.
Brick Walls
Brick requires masonry drill bits and wall plugs. These walls provide excellent support for heavy artwork when properly installed.
Concrete Walls
Concrete surfaces require heavy-duty anchors and specialized drilling equipment. They offer exceptional strength for large decorative pieces.
How to Maintain and Adjust Hung Pictures
Over time, pictures may shift slightly due to vibrations, door movement, or environmental changes. Periodically check alignment and hardware security.
Dust frames regularly and inspect mounting hardware for signs of wear. Proper maintenance helps preserve both the artwork and the appearance of your walls.
Conclusion
Understanding how to hang a picture correctly can dramatically improve the appearance of any room. By selecting the right location, using proper hardware, taking accurate measurements, and following professional installation techniques, you can create a polished and visually appealing display that enhances your home’s interior design.
Whether hanging a single family photograph, a large statement piece, or an entire gallery wall, careful planning and attention to detail make all the difference. With the right approach, your artwork will remain secure, level, and beautifully positioned for years to come.
Frequently Asked Questions (FAQ)
What is the best height to hang a picture?
The center of the picture should generally be positioned 57 to 60 inches from the floor, which corresponds to average eye level.
How do I hang a heavy picture without damaging the wall?
Use wall studs whenever possible or install heavy-duty wall anchors designed for the frame’s weight.
Can I hang a picture without nails?
Yes. Adhesive strips and damage-free hanging solutions are available for lightweight frames.
How much space should I leave above furniture?
Leave approximately 6 to 12 inches between the bottom of the picture and the top of the furniture.
How do I know if a picture is level?
Use a spirit level or a digital level tool to ensure the frame is perfectly horizontal.
What tools do I need to hang a picture?
Basic tools include a measuring tape, level, pencil, hammer, picture hooks, nails, and wall anchors.
How far apart should pictures be in a gallery wall?
Most designers recommend keeping frames 2 to 4 inches apart for a balanced and cohesive appearance.